Difference between revisions of "Change or Exclude Erroneous Head Surface Point Locations"
(→View and save head surface points) |
|||
| Line 12: | Line 12: | ||
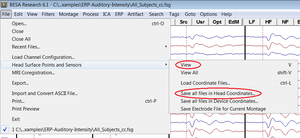
To exclude these points, the head surface points can be written to an ASCII file by using the command ''File→Head surface points and sensors→Save all files in head coordinates''. | To exclude these points, the head surface points can be written to an ASCII file by using the command ''File→Head surface points and sensors→Save all files in head coordinates''. | ||
| − | + | [[File:View_and_Save_head_surface_points.png|300px|thumb|right|View and save head surface points in BESA Research]] | |
| − | [[File:View_and_Save_head_surface_points.png]] | + | |
== Edit head surface points == | == Edit head surface points == | ||
Revision as of 15:47, 12 May 2016
| Module information | |
| Modules | BESA Research Basic or higher |
| Version | 5.2 or higher |
View and save head surface points
After importing head surface points, they can be inspected using the menu command File→Head Surface Points and Sensors→View or V on the keyboard.
If some points were not digitized correctly, it should be apparent from the 3D view.
To exclude these points, the head surface points can be written to an ASCII file by using the command File→Head surface points and sensors→Save all files in head coordinates.
Edit head surface points
The digitized head surface points are written to a file entitled filename.sfp, which is located in the same folder as your ela file filename.ela. They can be edited using any text editor program.
Then the data file can be re-opened in BESA, and the edited head surface point file is read automatically.
Important note: When using MEG and EEG simultaneously, it is important that the filename.pos file is also written and read in the same coordinate system as the surface points!
