Difference between revisions of "Importing BESA Statistics Results into Excel"
| (2 intermediate revisions by 2 users not shown) | |||
| Line 2: | Line 2: | ||
|title = Module information | |title = Module information | ||
|module = BESA Statistics | |module = BESA Statistics | ||
| − | |version = 1.0 or higher | + | |version = BESA Statistics 1.0 or higher |
}} | }} | ||
| − | In BESA Statistics there are two options for exporting results: summary results and detailed results. In both cases the results are exported as | + | In BESA Statistics there are two options for exporting results: '''summary results''' and '''detailed results'''. In both cases the results are exported as ASCII files in comma-separated values (CSV) format. For the values which are stored in the files a dot (.) is used as a decimal separator and no symbol is used as a thousands separator. This can causes problems when importing the data into Microsoft Excel and the settings in Excel are different than the assumed for the values, e.g. the decimal separator is a comma (,) and the thousands separator is a dot (.). This is the case, for example, in Germany. |
In order to make sure that the results are imported correctly into Excel one has to follow the next procedure. | In order to make sure that the results are imported correctly into Excel one has to follow the next procedure. | ||
| − | |||
| − | + | 1. Open Excel and select the <tt>Data</tt> tab | |
| − | + | [[File:MicrosoftExcelDataTab.png|none|Figure 1 Microsoft Excel Data tab|500px]] | |
| − | |||
| − | + | 2. Click on the icon <tt>From Text</tt> and select the corresponding CSV-file. | |
| − | [[File: | + | [[File:MicrosoftExcelFromText.png|none|Figure 2 Microsoft Excel Data tab, From Text button|500px]] |
| − | |||
| − | + | 3. The <tt>Text Import Wizard</tt> dialog opens. In the first step choose the option <tt>Delimited</tt> and click <tt>Next</tt>. | |
| − | + | [[File:TextImportWizardStep1.png|none|Figure 3 Microsoft Excel Text Import Wizard Step 1|600px]] | |
| − | |||
| − | + | 4. In the second step choose as a delimiter <tt>Semicolon</tt> and click next. | |
| − | [[Category:Statistics]] | + | [[File:TextImportWizardStep2.png|none|Figure 4 Microsoft Excel Text Import Wizard Step 2|600px]] |
| + | |||
| + | |||
| + | 5. In the third step click on <tt>Advanced...</tt> and in the <tt>Advanced Text Import Settings</tt> dialog select a dot (.) as a decimal separator and empty character as a thousands separator. | ||
| + | |||
| + | [[File:TextImportWizardStep3.png|none|Figure 5 Microsoft Excel Text Import Wizard Step 3|700px]] | ||
| + | |||
| + | |||
| + | 6. Click <tt>OK</tt> and then on <tt>Finish</tt> to complete the <tt>Text Import Wizard</tt>. The data should be imported correctly now. | ||
| + | |||
| + | [[Category:Statistics]] [[Category:Data Import/Export]] | ||
Latest revision as of 10:07, 5 May 2021
| Module information | |
| Modules | BESA Statistics |
| Version | BESA Statistics 1.0 or higher |
In BESA Statistics there are two options for exporting results: summary results and detailed results. In both cases the results are exported as ASCII files in comma-separated values (CSV) format. For the values which are stored in the files a dot (.) is used as a decimal separator and no symbol is used as a thousands separator. This can causes problems when importing the data into Microsoft Excel and the settings in Excel are different than the assumed for the values, e.g. the decimal separator is a comma (,) and the thousands separator is a dot (.). This is the case, for example, in Germany.
In order to make sure that the results are imported correctly into Excel one has to follow the next procedure.
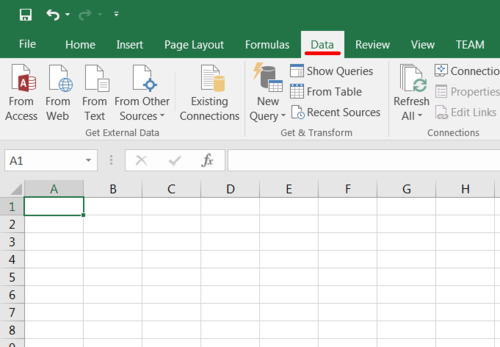
1. Open Excel and select the Data tab
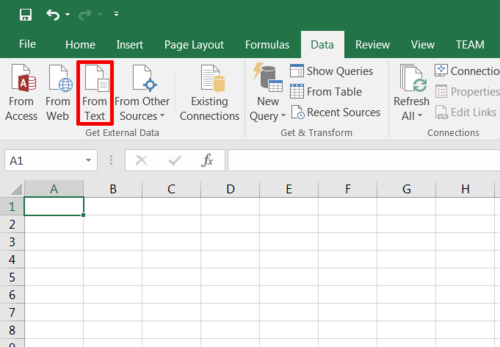
2. Click on the icon From Text and select the corresponding CSV-file.
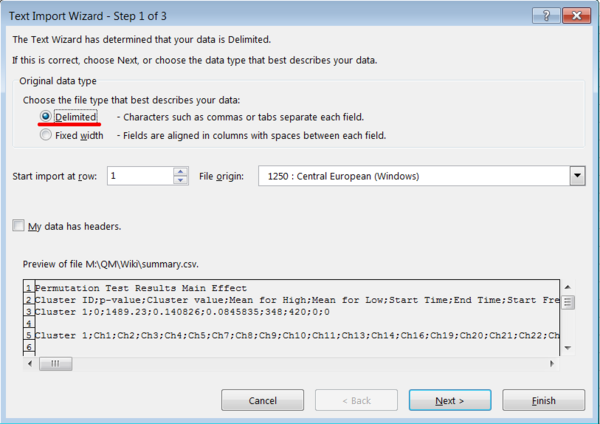
3. The Text Import Wizard dialog opens. In the first step choose the option Delimited and click Next.
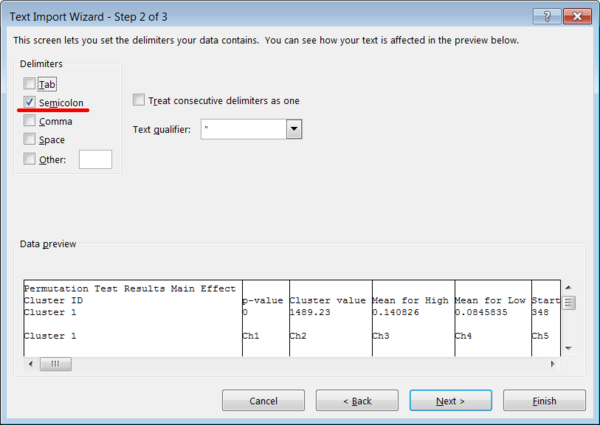
4. In the second step choose as a delimiter Semicolon and click next.
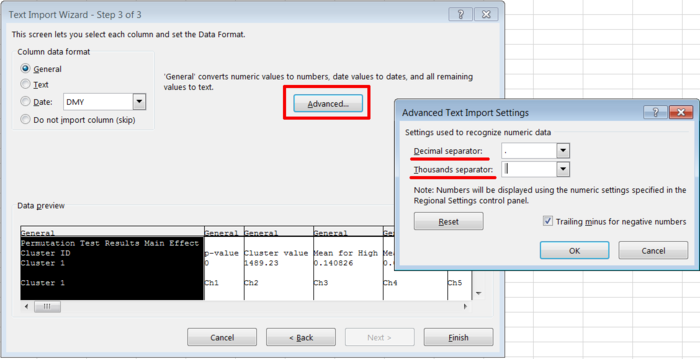
5. In the third step click on Advanced... and in the Advanced Text Import Settings dialog select a dot (.) as a decimal separator and empty character as a thousands separator.
6. Click OK and then on Finish to complete the Text Import Wizard. The data should be imported correctly now.
