Difference between revisions of "Integration of Custom Template Head-Models"
(→Edit template_head_models.ini) |
m (→Edit template_head_models.ini) |
||
| Line 117: | Line 117: | ||
|} | |} | ||
| − | === Edit template_head_models.ini === | + | === Edit ''template_head_models.ini'' === |
Open the ''template_head_models.ini'' file (located in ''C:\Program Files (x86)\BESA\Research_6_1\System\TemplateHeadModels\'') in a text editor and scroll down to the bottom of the file. Add a new section for your template head-model (increase model ID in square brackets). E.g.: | Open the ''template_head_models.ini'' file (located in ''C:\Program Files (x86)\BESA\Research_6_1\System\TemplateHeadModels\'') in a text editor and scroll down to the bottom of the file. Add a new section for your template head-model (increase model ID in square brackets). E.g.: | ||
| − | <source lang=" | + | <source lang="ini" highlight="14"> |
[Model20] | [Model20] | ||
Name=Age 0y 3mo | Name=Age 0y 3mo | ||
| Line 140: | Line 140: | ||
Note: The GroupID defines the top level group that can contain several template head models. Please use | Note: The GroupID defines the top level group that can contain several template head models. Please use | ||
| − | <source lang=" | + | <source lang="text"> |
GroupID=0001 | GroupID=0001 | ||
</source > | </source > | ||
Revision as of 17:28, 9 August 2018
| Module information | |
| Modules | BESA Research, BESA MRI |
| Version | 6.1 or higher, 2.0 or higher |
Contents
- 1 Introduction
- 2 Prerequisites
- 3 Custom Template Head-Model Integration in BESA Research 6.1
- 3.1 MRI Segmentation
- 3.2 Load Sample EEG Data in BESA Research
- 3.3 Coregistration of EEG and MRI Data
- 3.4 Create new Folder for Custom Template Head-Model
- 3.5 Copy Files to Custom Template Head-Model Folder
- 3.6 Save Electrode Coordinates File
- 3.7 Create Talairach Transformation File
- 3.8 Rename Template Head-Model Files
- 3.9 Edit template_head_models.ini
- 3.10 Use your custom Template Head-Model in BESA Research 6.1
Introduction
This tutorial will guide you through the steps of how to create a custom template head-model in order to use it in the Source Analysis module of BESA Research 6.1.
Prerequisites
To create the template, you need to have the latest versions of BESA Research 6.1 and BESA MRI 2.0 installed on your computer. MRI data needs to be prepared to be available in either DICOM, Analyze or Nifti format.
Sample EEG data for coregistration using a predefined electrode configuration is required. Please download the required zip folder here: Download Link
Custom Template Head-Model Integration in BESA Research 6.1
MRI Segmentation
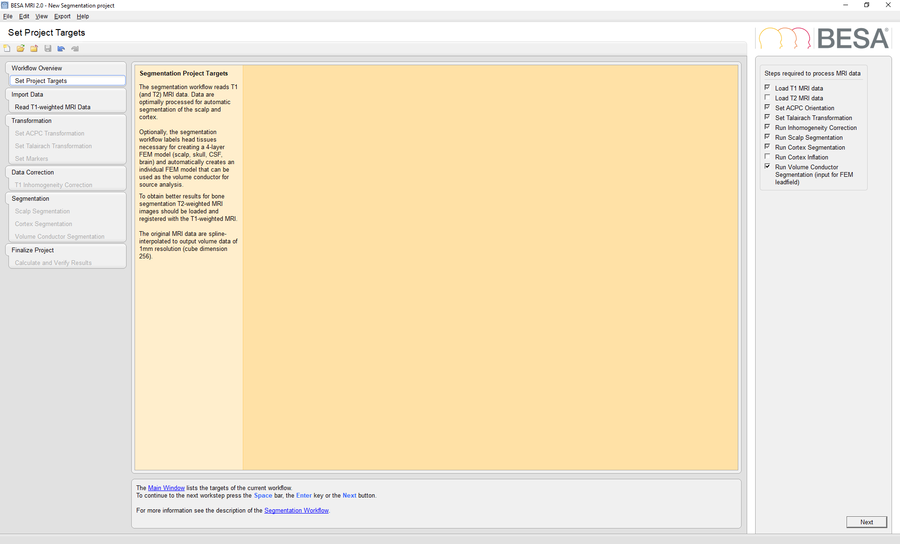
Start BESA MRI 2.0 and run a new segmentation project to perform a segmentation of the template MRI data in BESA MRI. Please mind that is necessary to check the option Run Volume Conductor Segmentation in the Set Project Targets workstep.
The segmentation is a fully automatic, robust procedure which in general delivers very accurate segmentations. In some rare cases, however, it might happen that the automatic segmentation result contains inaccuracies and might, thus, be considered as inadequate. Segmentation problems might occur for data sets with atypical anatomy, for example, data sets containing brain lesions, as well as infant data sets. An alternative way of generating an adequate segmentation is to manually correct the segmentation mask, and then use the corrected segmentation mask as the basis for the FE mesh generation. This approach is well described on the following BESA Wiki website: Correcting Volume Conductor Segmentations
Load Sample EEG Data in BESA Research
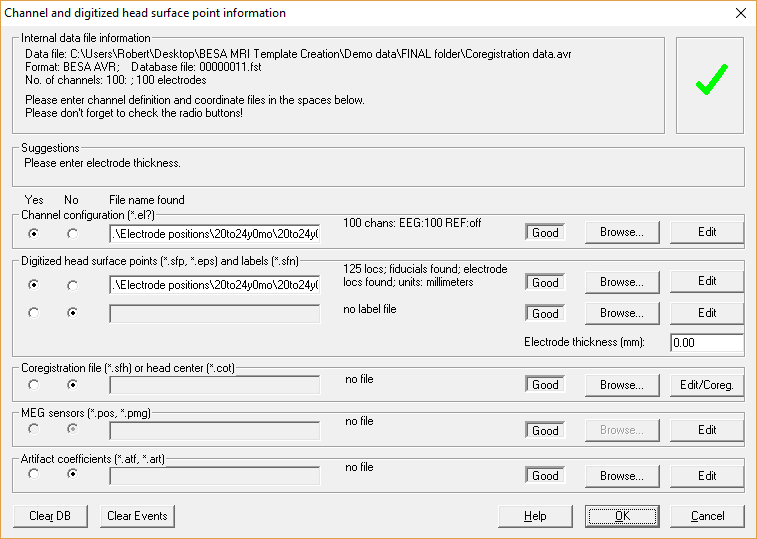
Open BESA Research and load the file Coregistration data.avr located in the downloaded zip folder. To add electrode coordinates, navigate to File -> Head Surface Points and Sensors -> Load Coordinate Files.... Press Browse in the Channel configuration (*.el?) section and select the age-appropriate *.elp file from the Electrode positions folder in the downloaded sample EEG data.
Also load the age-appropriate *.sfp file by pressing Browse in the Digitized head surface points (*.sfp, *.eps) and labels (*.sfn) section and select the respective *.sfp file.
The following screenshot shows the Channel and digitized head surface point information dialog with both files loaded from the 20to24y0mo subfolder.
Please note that the coordinates of the electrode configuration will be fitted during coregistration and need not to have a perfect match with your template head-model at this step. Confirm all settings and leave this dialog via pressing OK. To check if all files were read correctly, open the Surface Points dialog (press V on your keyboard or select File -> Head Surface Points and Sensors -> View).
Coregistration of EEG and MRI Data
For coregistration of the sample EEG data set with your template head-model, select File -> Coregistration. Store the *.sfh file with the proposed filename. BESA MRI will now be started and a new coregistration project is preselected. If it is not started, press the Start New Coregistration button.
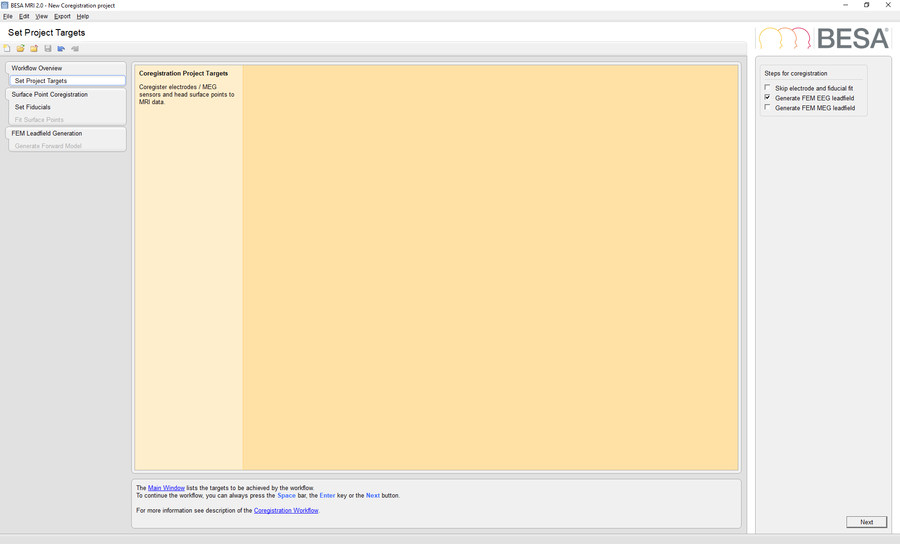
Check the option Generate FEM EEG Leadfield in the Set Project Targets workstep and select the previously segmented MRI project as input for coregistration. Load the electrode configuration file Coregistration data.sfh in the Fit Surface Points workstep. Finalize the coregistration project by choosing the desired conductivity values, run the FEM computation and finally save the finished project.
Create new Folder for Custom Template Head-Model
To add a new template head-model for BESA Research, navigate to the installation directory. The default installation directory for BESA Research 6.1 is:
C:\Program Files (x86)\BESA\Research_6_1\
and create a new folder (e.g. 0y3mo) in the .\System\TemplateHeadModels\AgeAppropriateTemplates\ subfolder.
Copy Files to Custom Template Head-Model Folder
Copy the following files from the BESA MRI project folder: <BESA MRI Shared Folder>\<Project Name>\MRIFiles\ to the newly created folder.
Note: If you cannot locate your BESA MRI project folder, open BESA MRI and choose File -> Select Data Folder. The opened dialog will give you the location of your BESA MRI project folder. Close the dialog with pressing Cancel in order not to change the setting.
Copy the following files:
- \FEMFiles\MRICor_COR__MRI_T1__Coregistration EEG 100_FEM_DATA.lft
- \FEMFiles\MRISeg_MRI_T1_FEM_DATA.loc
- \FEMFiles\MRISeg_MRI_T1_FEM_DATA.srf
- \SurfaceFiles\MRISeg_MRI_T1_TAL.srf
- \SurfaceFiles\MRISeg_MRI_T1_TAL_WM.srf
- \VMRFiles\MRISeg_MRI_T1_TAL.vmr
- \VMRFiles\MRISeg_MRI_T1_TAL_LV.vmr
Save Electrode Coordinates File
In order to create the electrode configuration file for your custom template head-model, switch back to BESA Research and navigate to File -> Head Surface Points and Sensors -> Save all Files in Head Coordinates. Save the files under the suggested filename. Copy the file Coregistration data_HC.elp to the newly created custom template head-model folder.
Create Talairach Transformation File
In order to create the talairach transformation file, create the file Talairach Trafo.tal in the new template head-model folder and open it with a text editor. Follow the steps described in the example on how to generate a Talairach transformation (*.tal) file from a BESA MRI coregistration (*.sfh) file on the Talairach Transformation File page.
Rename Template Head-Model Files
Rename the files in the newly created template head-model folder according to the chosen head-model name:
| Original filename | Rename to |
|---|---|
| MRISeg_MRI_T1_FEM_DATA.srf | FEM_0y3mo.srf |
| MRISeg_MRI_T1_FEM_DATA.loc | FEM_0y3mo.loc |
| MRISeg_MRI_T1_TAL.vmr | MRI_0y3mo.vmr |
| MRISeg_MRI_T1_TAL.srf | MRI_0y3mo_Skin.srf |
| MRISeg_MRI_T1_TAL_WM.srf | MRI_0y3mo_Brain.srf |
| MRISeg_MRI_T1_TAL_LV.vmr | MRI_0y3mo_LV.vmr |
| Coregistration data_HC.elp | FEM_0y3mo.elp |
| MRICor_COR__MRI_T1__Coregistration EEG 100_FEM_DATA.lft | FEM_0y3mo.lft |
| Talairach Trafo.tal | FEM_0y3mo.tal |
Edit template_head_models.ini
Open the template_head_models.ini file (located in C:\Program Files (x86)\BESA\Research_6_1\System\TemplateHeadModels\) in a text editor and scroll down to the bottom of the file. Add a new section for your template head-model (increase model ID in square brackets). E.g.:
[Model20]
Name=Age 0y 3mo
Description=My custom template head-model for infants in the age group of 3 months.
SourceSpaceSurfFile=AgeAppropriateTemplates\0y3mo\FEM_0y3mo.srf
SourceSpaceGridFile=AgeAppropriateTemplates\0y3mo\FEM_0y3mo.loc
MRIFile=AgeAppropriateTemplates\0y3mo\MRI_0y3mo.vmr
ScalpSurfFile=AgeAppropriateTemplates\0y3mo\MRI_0y3mo_Skin.srf
BrainSurfFile=AgeAppropriateTemplates\0y3mo\MRI_0y3mo_Brain.srf
MaskFile=AgeAppropriateTemplates\0y3mo\MRI_0y3mo_LV.vmr
ElectrodeFile=AgeAppropriateTemplates\0y3mo\FEM_0y3mo.elp
LeadFieldFile=AgeAppropriateTemplates\0y3mo\FEM_0y3mo.lft
TalPtsFile=AgeAppropriateTemplates\0y3mo\FEM_0y3mo.tal
ID=0011
GroupID=0001
Note: The GroupID defines the top level group that can contain several template head models. Please use
GroupID=0001
for custom template head-models. The ID is a unique identifier within a specific group that is related to a single template head-model. Please increment the GroupID by one for each model.
Use your custom Template Head-Model in BESA Research 6.1
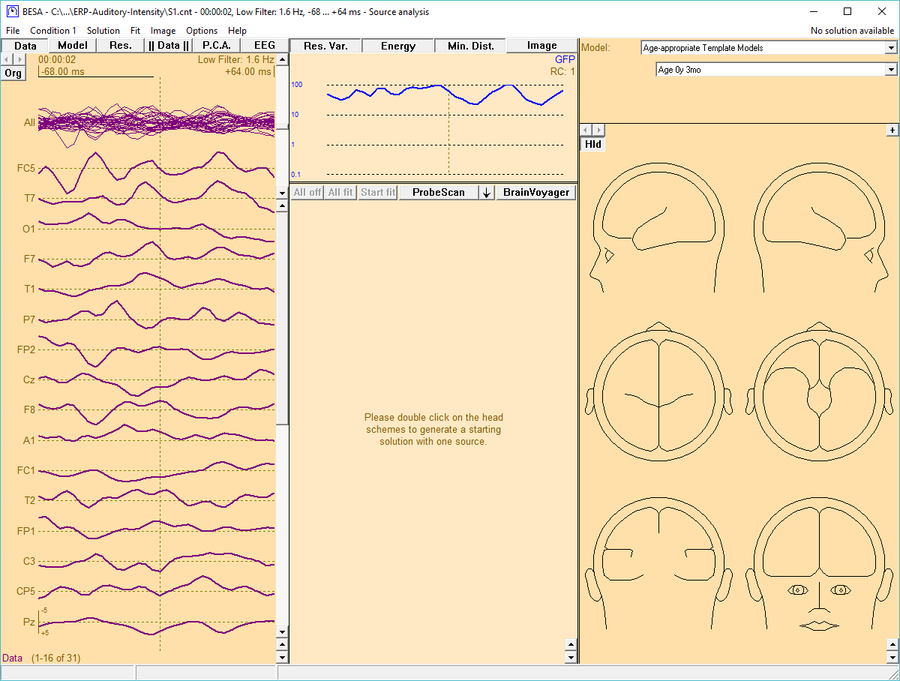
After restarting BESA Research, open a data file and send a data segment to the Source Analysis module. The custom template head-model is available in the top-right window. Select Age-appropriate Template Models for the Model type and then choose the new custom template head-models from the drop-down box below.


