Difference between revisions of "Batch Processing"
| Line 14: | Line 14: | ||
*commands for distributed source analysis | *commands for distributed source analysis | ||
*time-frequency commands | *time-frequency commands | ||
| + | |||
| + | |||
[[File:BatchMenu.jpg|none|left]] | [[File:BatchMenu.jpg|none|left]] | ||
| + | |||
| + | |||
For example, to automate averaging and to prepare data for statistical analysis, using an experimental paradigm for a number of subjects, a batch could have the following elements: | For example, to automate averaging and to prepare data for statistical analysis, using an experimental paradigm for a number of subjects, a batch could have the following elements: | ||
*Load the paradigm | *Load the paradigm | ||
| Line 22: | Line 26: | ||
In batch code, this will look like the following: | In batch code, this will look like the following: | ||
| − | [[File:BatchExample.png|none|left]] | + | |
| + | [[File:BatchExample.png|none|left]] | ||
| + | |||
| + | |||
To add any command, e.g. “Average”, select the command from the list of commands and check the options dialog that appears: | To add any command, e.g. “Average”, select the command from the list of commands and check the options dialog that appears: | ||
| + | |||
[[File:BatchExampleAv.png|700px|none|left]] | [[File:BatchExampleAv.png|700px|none|left]] | ||
| + | |||
Left side: First click the "Add Command" button. Then select a command from the list. Right side: After selecting, a dialog opens where command options can be defined. | Left side: First click the "Add Command" button. Then select a command from the list. Right side: After selecting, a dialog opens where command options can be defined. | ||
Once the batch is complete, it can run over all open files, over a user-defined file list (simply drag files into the list from Explorer), or just over the current file. Note that these batches are produced without entering any line of code by hand – it is all done using the graphical user interface of the Batch dialog. | Once the batch is complete, it can run over all open files, over a user-defined file list (simply drag files into the list from Explorer), or just over the current file. Note that these batches are produced without entering any line of code by hand – it is all done using the graphical user interface of the Batch dialog. | ||
| + | |||
== An example batch for Averaging step by step == | == An example batch for Averaging step by step == | ||
The first two commands will load the paradigm file and perform the artifact scan: | The first two commands will load the paradigm file and perform the artifact scan: | ||
| − | < | + | <pre> |
Paradigm(%Scripts%\Paradigm\Auditory\AEP_Intensity.PDG) | Paradigm(%Scripts%\Paradigm\Auditory\AEP_Intensity.PDG) | ||
| − | |||
ArtifactScan(Wait) | ArtifactScan(Wait) | ||
| − | </ | + | </pre> |
| + | |||
| + | |||
[[File:BatchArtScan.png|500px|none|left]] | [[File:BatchArtScan.png|500px|none|left]] | ||
| + | |||
The next command will average over the conditions: | The next command will average over the conditions: | ||
| − | < | + | <pre> |
Average(%basename%_av, %Examples%\ERP-Auditory-Intensity\Averages\, NoDefaultName,OverwriteTarget, NoCorrect) | Average(%basename%_av, %Examples%\ERP-Auditory-Intensity\Averages\, NoDefaultName,OverwriteTarget, NoCorrect) | ||
| − | </ | + | </pre> |
| + | |||
[[File:BatchExampleAv2.png|500px|none|left]] | [[File:BatchExampleAv2.png|500px|none|left]] | ||
| + | |||
The next commands will loop over the first 5 segments (condition averages) and export them to different ASCII files to be used in further processing in BESA Statistics or other programs: | The next commands will loop over the first 5 segments (condition averages) and export them to different ASCII files to be used in further processing in BESA Statistics or other programs: | ||
| − | |||
| − | |||
| + | <pre> | ||
| + | MAINFileOpen(%Examples%\ERP-Auditory-Intensity\Averages\%basename%_av.fsg) | ||
GENFor(segm, 1, 5, 1, 1) | GENFor(segm, 1, 5, 1, 1) | ||
| − | |||
MAINMarkBlock(WholeSegment,-,%segm%) | MAINMarkBlock(WholeSegment,-,%segm%) | ||
| − | |||
MAINExport(%basename%-export%segm%, \, Segment, ASCvec, Original, FiltOff, NoResample, Replace, -, ) | MAINExport(%basename%-export%segm%, \, Segment, ASCvec, Original, FiltOff, NoResample, Replace, -, ) | ||
| − | |||
GENEndFor() | GENEndFor() | ||
| − | </ | + | </pre> |
| + | |||
[[File:BatchExampleAv3.png|500px|none|left]] | [[File:BatchExampleAv3.png|500px|none|left]] | ||
| + | |||
Of course, many more options are available – check it out! For example, segments can automatically be sent to Source Analysis to perform automated imaging and export these results for further analysis, too. | Of course, many more options are available – check it out! For example, segments can automatically be sent to Source Analysis to perform automated imaging and export these results for further analysis, too. | ||
Revision as of 14:16, 24 May 2017
| Module information | |
| Modules | BESA Research Basic or higher |
| Version | 5.2 or higher |
BESA batches allow you to automate nearly all analysis steps in BESA
The batch functionality that you find under the “Process” menu has been around for a while. Over the past few years, the toolkit that is available there has grown to an impressive size, such that with BESA Research 6.0, virtually all analysis steps can be automated, and applied to a list of files. At any point in time, the batch can also be halted to make parameter adjustments, should this be necessary. A complete analysis from pre-filtering, artifact scanning, averaging, source analysis, and export of results for subsequent statistical analysis, can be summarized in few steps. For many recurring tasks, ready-made batches are available already – and batches can also be assigned to function keys for maximum ease of use.
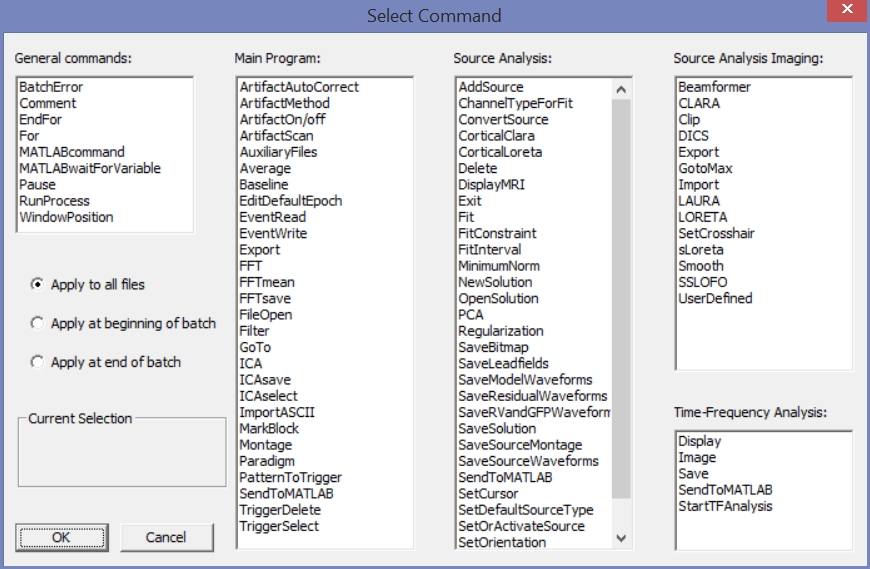
The set of available commands is shown below – sub-divided into
- general commands which allow e.g. loops, error handling, or pausing the batch for user input
- commands affecting the main program including ERP management
- commands for discrete source analysis
- commands for distributed source analysis
- time-frequency commands
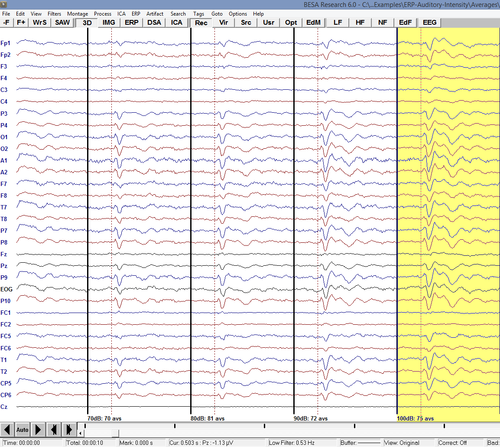
For example, to automate averaging and to prepare data for statistical analysis, using an experimental paradigm for a number of subjects, a batch could have the following elements:
- Load the paradigm
- Perform an artifact scan
- Average the conditions
- Export the data of each condition for further analysis with BESA Statistics
In batch code, this will look like the following:
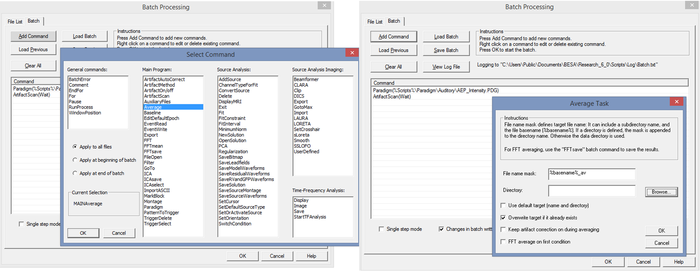
To add any command, e.g. “Average”, select the command from the list of commands and check the options dialog that appears:
Left side: First click the "Add Command" button. Then select a command from the list. Right side: After selecting, a dialog opens where command options can be defined.
Once the batch is complete, it can run over all open files, over a user-defined file list (simply drag files into the list from Explorer), or just over the current file. Note that these batches are produced without entering any line of code by hand – it is all done using the graphical user interface of the Batch dialog.
An example batch for Averaging step by step
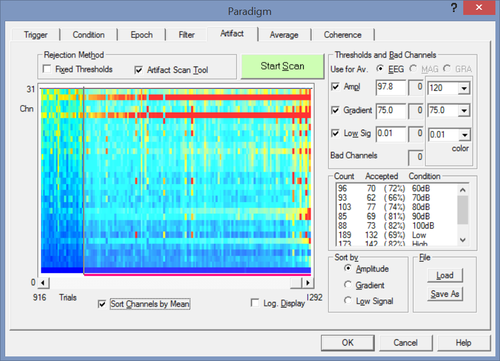
The first two commands will load the paradigm file and perform the artifact scan:
Paradigm(%Scripts%\Paradigm\Auditory\AEP_Intensity.PDG)
ArtifactScan(Wait)
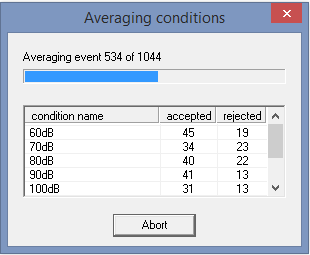
The next command will average over the conditions:
Average(%basename%_av, %Examples%\ERP-Auditory-Intensity\Averages\, NoDefaultName,OverwriteTarget, NoCorrect)
The next commands will loop over the first 5 segments (condition averages) and export them to different ASCII files to be used in further processing in BESA Statistics or other programs:
MAINFileOpen(%Examples%\ERP-Auditory-Intensity\Averages\%basename%_av.fsg)
GENFor(segm, 1, 5, 1, 1)
MAINMarkBlock(WholeSegment,-,%segm%)
MAINExport(%basename%-export%segm%, \, Segment, ASCvec, Original, FiltOff, NoResample, Replace, -, )
GENEndFor()
Of course, many more options are available – check it out! For example, segments can automatically be sent to Source Analysis to perform automated imaging and export these results for further analysis, too.
More information on how to create batches can be found on our web site in Tutorial on Batch Scripts – browse to section B.
