Difference between revisions of "How to Prepare Data for BESA Statistics"
m (→Preparing TFC data) |
|||
| Line 124: | Line 124: | ||
| − | [[Category:Statistics]] | + | [[Category:Statistics]] [[Category:Data Import/Export]] |
Revision as of 12:06, 2 February 2021
| Module information | |
| Modules | BESA Research Basic or higher,
BESA Statistics |
| Version | 6.0 or higher (BR), 1.0 or higher (BS) |
Contents
Note and general remarks
This article applies to data that are prepared using BESA Research. It is also possible to read data prepared by other programs. For the requirements, please refer to the BESA Statistics manual, the chapter on "Loading data that were created in other software" and the chapter "File formats".
Whatever data format is used, the suggested data organization is to place all data files for one condition (or one group) into a dedicated sub-folder. That will make it easy to load them into BESA Statistics.
Data types accepted by BESA Statistics
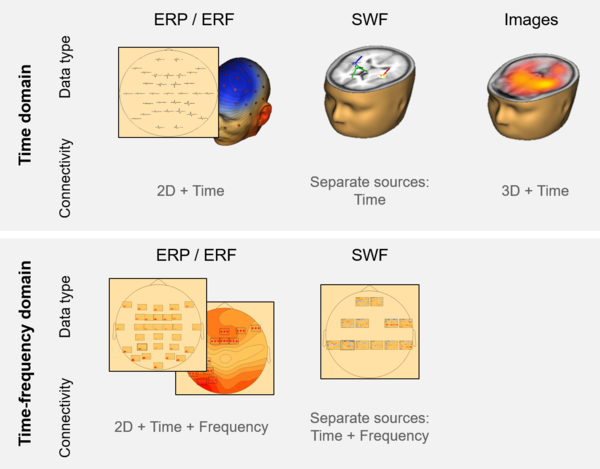
The following graph shows the data types that are accepted.
- ERP: event-related potential
- ERF: event-related field
- SWF: source waveforms
Preparing ERP/ERF data
BESA Statistics needs the following data:
- ERP or ERF files - one for each subject and each condition
- elp file - one file for the whole experiment
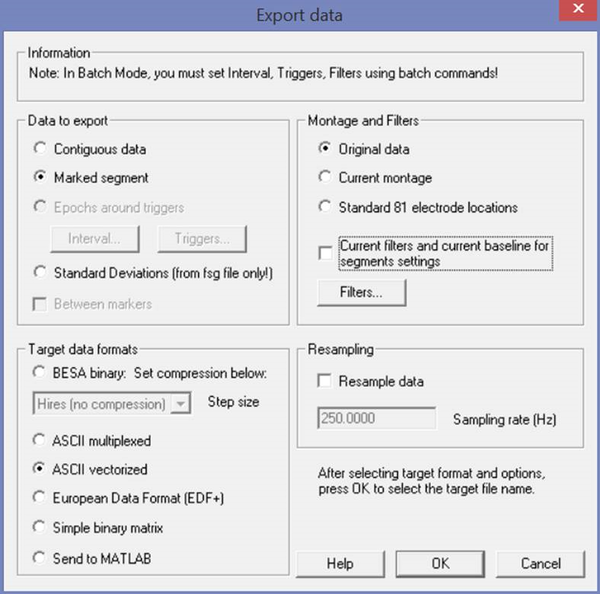
The ERP/ERF files are exported from BESA Research as ASCII vectorized data (*.avr format). You can do this in the following way:
Using the batch mode:
- Use the command "Mark Block" and select the "Whole Segment" option
- Use the command "Export" and select options "Marked Segment" and "ASCII vectorized".
By hand:
- Right-click on an averaged data segment and select "Whole Segment" from the popup menu.
- Then right-click again and select "Write Segment". In the dialog box (see below), select “ASCII vectorized” and un-tick the “Current filters” checkbox. That will save the data as “.avr” file as required by BESA Statistics.
Repeat these steps for all segments that are required.
The elp file is required once for all subjects / conditions, and placed into one of the data folders for BESA Statistics. An elp file is automatically saved when an ASCII export takes place. In case that an additional export of an elp file is necessary, it can be exported by using the menu "File → Head Surface Points and Sensors → Save all Files in Head Coordinates". Then browse to the folder you saved to, and find the "*.elp" file.
Preparing SWF data
Note: This requires BESA Research Standard or higher.
BESA Statistics needs the following data:
- SWF files - one for each subject and each condition
- bsa file - one file for the whole experiment
The SWF files are exported in the following way:
Using the batch mode:
- Use the command "Save Source Waveforms"
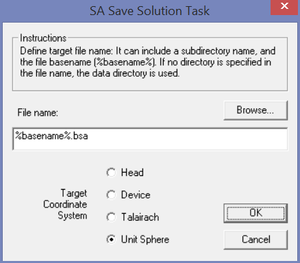
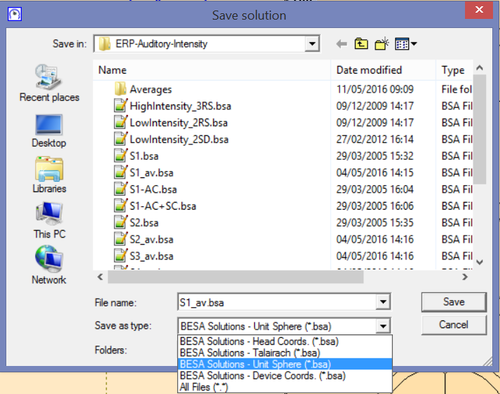
- For one of the conditions: Use the command "Save Solution" to save the locations of the sources. Use the Unit Sphere setting as shown in the figure at the right.
By hand:
- For each source waveform solution: In the Source analysis window, select menu entry "File → Save Source Waveforms As".
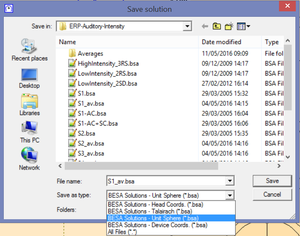
- For one of the conditions: Select menu entry "File → Save Solution As". In the dialog that appears, choose the type "BESA Solution – Unit Sphere" - see figure.
Preparing Image data
Note: This requires BESA Research Standard or higher.
BESA Statistics needs the following data:
- *.dat files - one for each subject and each condition
The dat files are exported in the following way:
- Using the batch mode: Use the command "Export" from the section Source Analysis Imaging.
- By hand: (For each image solution) In the Source analysis window, select menu entry "Image → Export Image As".
Preparing TFC data
Note: This requires BESA Research Complete, or BESA Research Basic plus Source Coherence module.
You can analyze time-frequency data for a given montage, but also the coherence of one channel with all other channels (see note at end).
BESA Statistics needs the following data:
- Time-frequency analysis or coherence results - one for each subject and each condition
- *.tfc files
- A file describing the channel configuration - one file for the whole experiment
- *.elp file: if your montage is in sensor space
- *.bsa file: if your montage is in source space
Time-frequency file (*.tfc)
The tfc files are exported in the following way:
- Using the batch mode:
- Use the command "Save" from the section Time-Frequency Analysis. In the options for the batch command, choose "ASCII data file".
- By hand:
- In the Time-Frequency window, select "File → Export to ASCII file...".
Repeat this step for all subjects and conditions.
Channel file (*.elp or *.bas)
For one of the conditions, a channel file is required.
- If your montage is in sensor space:
- An elp file is required once for all subjects / conditions, and placed into one of the data folders for BESA Statistics. It can be exported by using the menu "File → Head Surface Points and Sensors → Save Electrode File For Current Montage". Then browse to the folder you saved to, and find the "*.elp" file.
- If your montage is in source space:
- A bsa file is required once for all subjects / conditions, and placed into one of the data folders for BESA Statistics. It can be exported from the Source Analysis window. Open the solution that was used to generate the Source Montage. Then select menu entry "File → Save Solution As". In the dialog that appears, choose the type "BESA Solution – Unit Sphere" - see figure.
Note 1: If your montage is in source space and regional sources are used, then you have the option to use all orientations in the time-frequency analysis. If you do this, you have to change the "*.bsa" file such that you get one line for each orientation in the "*.bsa" file. This can be achieved by:
- Loading the solution into the Source Analysis Module.
- Orienting each regional source by selecting it and pressing the key 'O' on the keyboard.
- Converting the source to dipoles using the key 'C' on the keyboard.
- Then save the solution under a different name, and use this solution file as the channel file.
Note 2: If Coherence data are analyzed, please be aware that the export contains one less channel than the montage file. The channel that serves as the reference channel for the coherence is not exported. You will need to remove this channel from the elp file or bsa file by editing the file in a text editor and deleting the respective line.
