Pipeline for simultaneous EEG-fMRI recording
| Module information | |
| Modules | BESA Research Basic or higher |
| Version | 7.0 or higher |
Contents
Pipeline for simultaneous EEG-fMRI recording
Before you start
- Check if you have a clock synchronization between EEG and MRI systems
- Be sure that you have jitter between trials in ERP experiment (i.e. random value of ±200ms). Some further guidelines about paradigm creation can be found here: (Rusiniak et al., 2013a).
- Try to limit subject movement to minimum.
- Make sure electrode to skin impedance is as low as possible.
- Design EEG-fMRI recording session to be long enough for proper artifact creation. Usually the experiment should last at least 6 minutes.
- Especially for the first few registrations repeat the experiment outside of the bore to compare results.
Pipeline overview
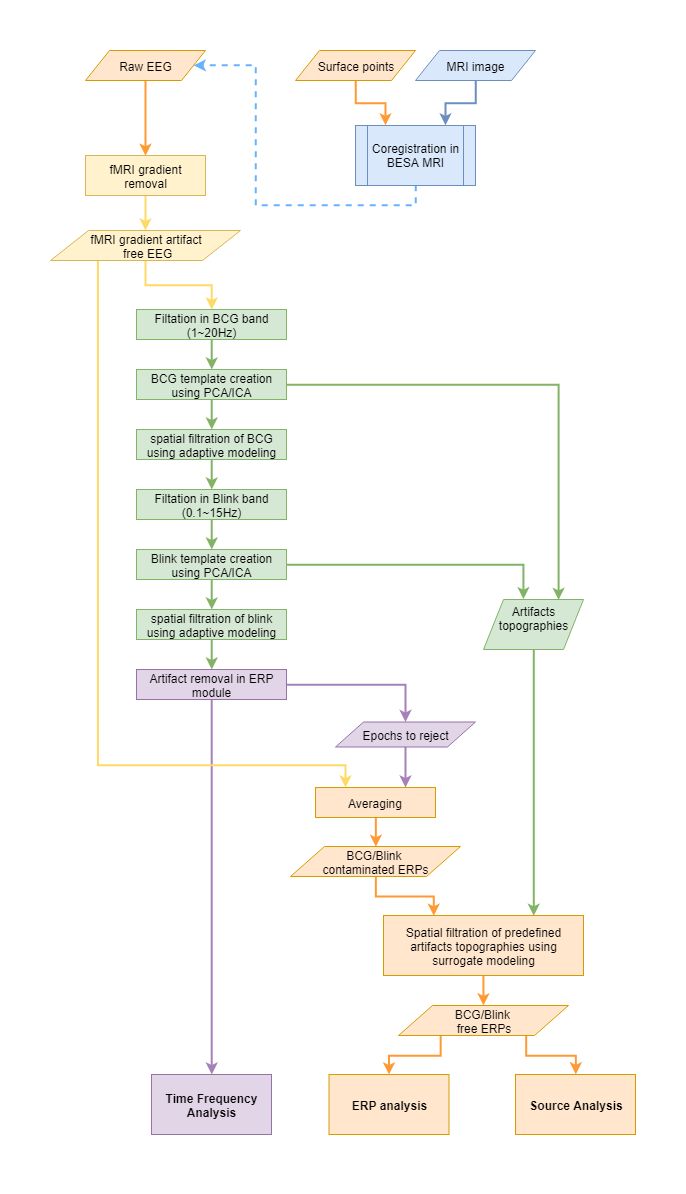
The recommended pipeline [1] of processing EEG data registered during fMRI session looks as follows:
Please note that some steps are grouped with colors:
- orange color indicates steps that are part of typical processing of ERP data.
- blue color indicates optional, yet strongly recommended EEG-MRI data co-registration.
- yellow color marks the steps related to fMRI gradient artifact removal
- green steps are reserved for BCG (and blink) artifact correction
- violet color indicates steps for time-frequency analysis. Here also information about rejected epochs is provided for averaging purpose.
fMRI gradient removal
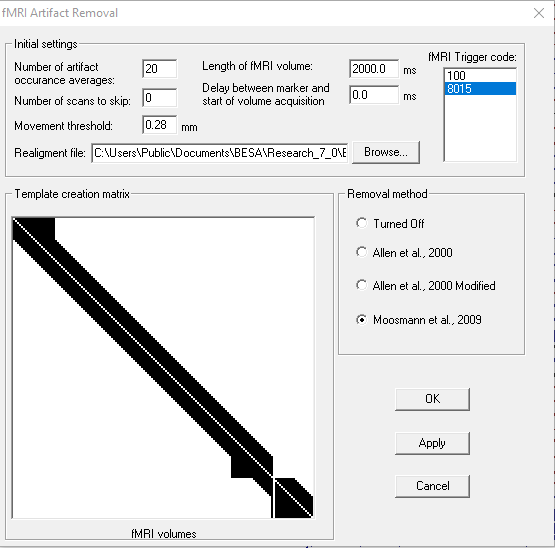
Please note that you need hardware clock synchronization between EEG equipment and MRI scanner before removing fMRI gradient artifact. Do not perform any sampling rate change (especially do not downsample data!) before performing this preprocessing step. Clock synchronization assures alignment between triggers present in EEG data and start of fMRI volume acquisition as well as consistent span between samples containing artifact. That means that every epoch containing fMRI induced artifact is identical. To remove fMRI gradient select the menu entry Artifact\fMRI artifact.... The following dialog box will appear:
Some of the parameters are strongly dependent on fMRI acquisition:
- Length of fMRI volume - it should be exactly the time of volume acquisition (time when MR gradients are ON for one volume acquisition). For continuous fMRI sessions this value is automatically detected. If you use sparse acquisition (between fMRI volumes there is a short period of silence), use time of volume acquisition parameter.
- fMRI trigger code - code in the EEG recording provided by MR scanner.
- Delay between marker and start of volume acquisition - a delay between marker in EEG provided by MR scanner and real start of fMRI volume acquisition. This value can be also used if sparse acquistion is used and scanning starts with some delays
- Number of scans to skip - if dummy scans (MR volumes acquired to stabilize magnetization) have corresponding markers in EEG data adjust this value to match the number of real volumes used for fMRI analysis.
- Realignment file - direct output file from first step of fMRI analysis (realignment). We support native realignment file as generated by SPM, FSL, AFNI and Brainvoyager.
Other parameters should be carefully selected depending on the data:
- Number of artifact occurrence averages - The default value is 16. That means that 8 preceding and 8 proceeding artifact occurrences are used to create the averaged template. Note that if an odd number is used (ie. 17) the signal from the volume that is being currently corrected is also used for averaging. If a larger number is selected then the artifact is more stable and more differentiated from EEG data. However if there is a lot of movement during the recording session the artifact template will be incorrect. A smaller number of artifact occurrences for averaging or more advanced methods of artifact removal should be selected in such situations.
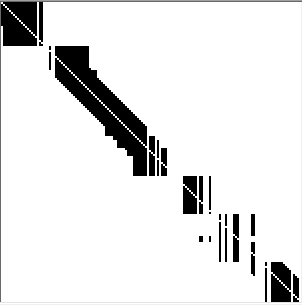
- Movement threshold - this parameter is only used for two advanced methods: Allen et al. 2000 Modified and Moosmann et al. 2009. When changing this value check how the template creation matrix looks. If you note that the matrix is highly segmented (as in the below example) you might consider increasing the threshold value.
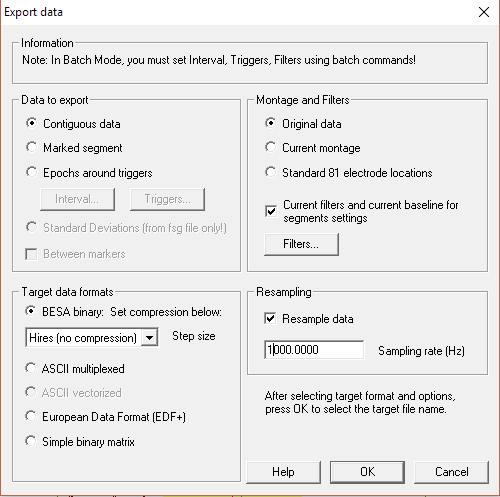
If you wish you can downsample data and export file with fMRI artifact gradient removed after using the aforementioned tool by pressing the WrS button:
BCG artifact correction
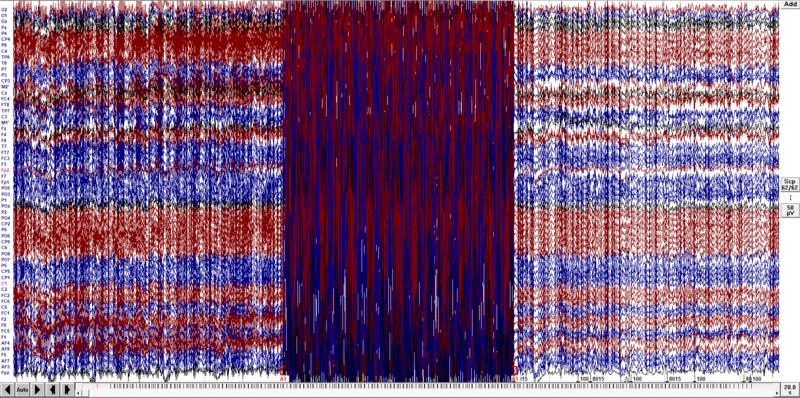
First scroll through the data and mark bad electrodes and bad blocks of data. Note that especially at the beginning of the recording there might be fragments of data still contaminated with an fMRI gradient artifact, as shown below. This is the correct behavior since the MRI machine use so-called dummy scans that are not for data collection but intended for magnetization stabilization. These volumes are also not usually associated with triggers in the data. If you use a paradigm it should start after these scans. The most typical approach is to start stimuli presentation after the fMRI session starts (experiment should be triggered by MRI scanner).
Recommendation for artifact template creation
For BCG artifact removal we recommend using the PCA based template creation. The ICA approach is a bit difficult for this matter since the BCG artifact is a complex signal distortion (constituted usually from more than three components). Also the main assumption of ICA is violated - components are dependent rather than independent. Keep in mind that the BCG artifact is induced by Hall effect, pulsating skin, and head movement. All of these phenomena are related to the heart beat. On top of that, the part related to movement can consist of up to six components in the worst scenario (head movement and head rotation, both possible in three dimensions).
How to create the template
Before attempting to create the artifact template, it is wise to set a filter to match the artifact frequency. For BCG, the following filter settings should be sufficient:
| Filter | Cutoff frequency | Filter slope | Filter type |
|---|---|---|---|
| Low Cutoff | 1 | zero phase | 12 dB/oct |
| High Cutoff | 20 | zero phase | 24 dB/oct |
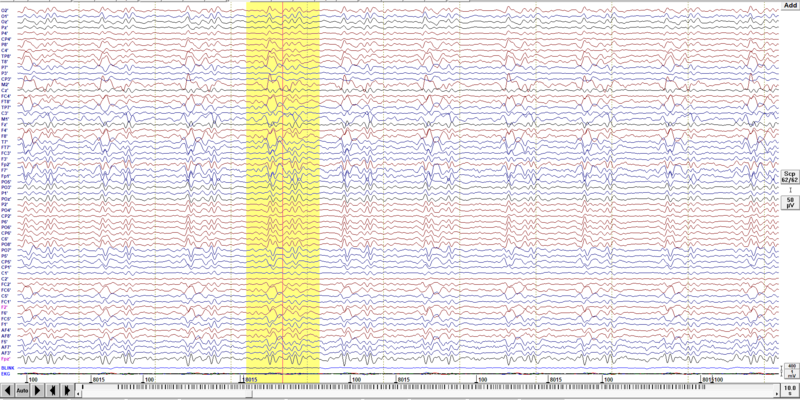
Mark a block of data where BCG is clearly noticeable. You can either use an EKG channel or just all channels as the BCG is very prominent (check the example below). If you decide to use an EKG channel remember that the BCG artifact starts around 200-300 ms after the QRS complex visible in EKG.
Go to menu Search and verify if Search, Average, View option is checked. If not, please enable it.
Press the SAV button in the toolbar to start creation of the artifact template. In the displayed dialog use settings as below to perform searching for artifact occurrences similar to the selected block, using all channels with a criterion for similarity of 65% correlation, after applying predefined filters. When you press OK, the search will start.
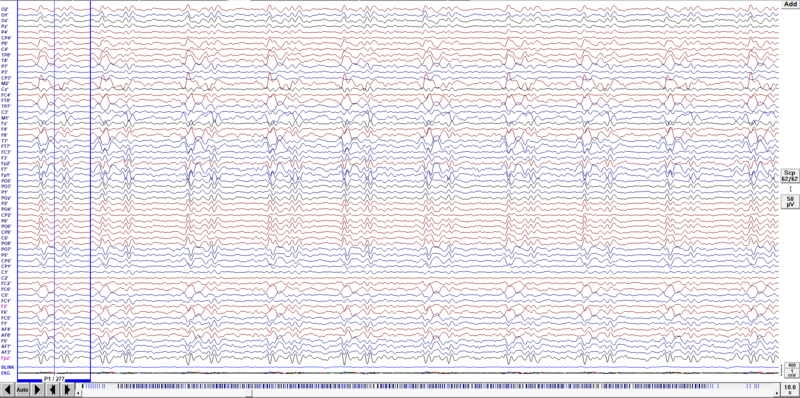
When the search is finished you will see the averaged artifact in a buffer on the left side of the data window, as shown below. If you start scrolling through data the averaged block disappear. You can switch it on at any time using the menu entry View/Averaged Buffers. Note that you have blue vertical lines (if you selected to assign the BCG artifacts to pattern 1) in the event bar at the bottom of screen. For good artifact correction they should cover almost the whole file. Also, at the bottom of the averaged buffer display you can see the number of averages (277 for example). Make sure that this number is relatively large to be sure the artifact template is correctly created.
How to select the correct number of components for artifact correction
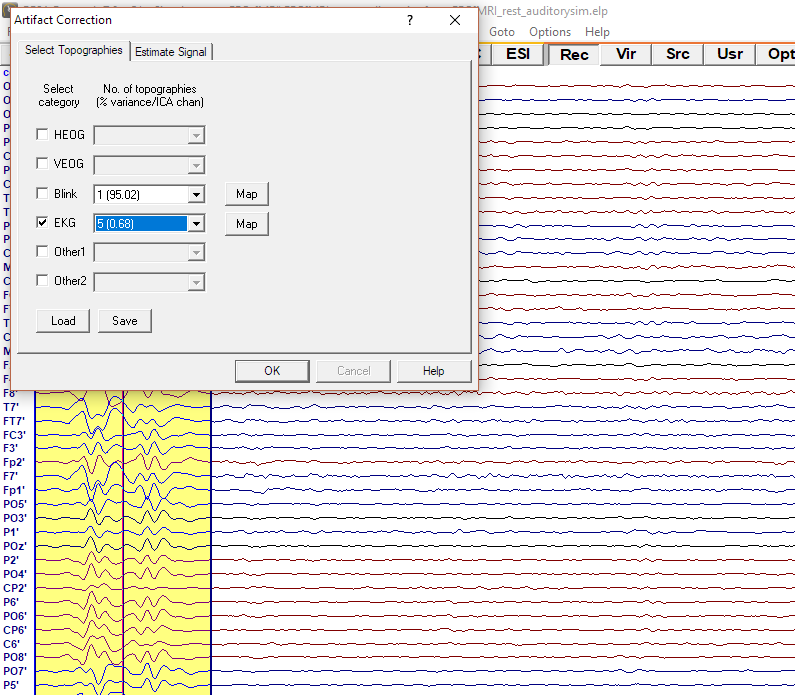
Finally click the right mouse button over the averaged buffer and select Whole Segment. Click again with the right mouse button over the yellow marked area and select Define Artifact Topography. A new dialog will pop up. Check the EKG box and select the number of components used for artifact correction. The component number is followed by a number indicating how much signal variability is explained by the component, expressed in percentage. A question without answer is how many components should be reduced, since it really depends on the data. As a good starting point you may select all components that explain more than 1% of the BCG variance (so basically select the first number with variance lower than 1% - as in the example below 5(0.68)). Note that data will be automatically updated to the current settings. You can adjust this number at any further stage of data processing.
Final data processing
If needed you can also perform blink artifact correction using an approach similar to the EKG reduction (but select only one component at the final stage, since it is a very well-established artifact).
Now you can proceed with further data processing. There are some minor differences in comparison with the general BESA pipeline:
- if you want to perform averaging you will be similarly asked if you want to turn off artifact correction. Please do so, by pressing Yes button. The artifact correction should be turned on again just after averaging. When the averaged file is open go to menu Artifact/Load... and select the file with the exact name of your data file but with extension .atf. Once the artifact coefficient file is loaded, go to menu Artifact\Options and change the method of brain activity modeling to Surrogate. Please verify if the selected number of artifact components used for reduction can be lowered.
Source analysis (requires BESA Research Standard or higher
- As you might have noticed in other tutorials, we generally recommend performing source localization while artifact correction is off, and load artifact coefficients directly to the source analysis module. For EEG-fMRI data however it is acceptable to use artifact corrected data as input to the source analysis module.
- if you want to perform Time-domain beamformer accessed from ERP module (average tab) you will be prompted if artifact correction should be turned off. We recommend to perform beamformer with artifact correction off, but for EEG-fMRI data set please keep it on (press No button), since the large BCG artifact will affect results.
Good practice
Please keep in mind that simultaneous EEG-fMRI recording is a difficult yet powerful technique. The following rules could help one to perform a successful experiment:
- Remember that proper EEG and MRI hardware clock synchronization is essential for fMRI gradient artifact removal. BESA Research internally performs checks if the synchronization is sufficient however it is the user's responsibility to maintain the hardware configuration. Under any circumstances do not change EEG data sampling rate prior to the fMRI gradient removal procedure.
- For an ERP experiment remember to introduce temporal jitter between trials (e.g. a random value in the range of ±200 ms). Also, applying a pure EEG or a pure fMRI paradigm will probably have the effect that one of the modalities will not show satisfying results. Proper paradigm preparation is essential for success. Some further guidelines can be found here: (Rusiniak et al., 2013a).
- Inform your subject how important it is not to move.
- Keep electrode to skin impedance as low as possible.
- The EEG-fMRI recording session should be long enough to allow for appropriate artifact template creation. Usually the experiment should last at least 6 minutes.
- At the same time try to limit the time of experiment to a minimum and preferably perform EEG-fMRI registration before other sequences to limit movement due to an inconvenient supine position.
- From the standard position, move the subject about 4 cm towards the caudal direction to reduce artifacts: The MRI laser crosshair should be not in the Nasion position but in the middle of the forehead (Mullinger et al., 2011).
- Especially for the first few registrations repeat the experiment outside of the MR bore to compare results.
References
- Abreu, R., Leal, A., Figueiredo, P., 2018. EEG-Informed fMRI: A Review of Data Analysis Methods. Front. Hum. Neurosci. 12, 29. https://doi.org/10.3389/fnhum.2018.00029
- Allen, P.J., Josephs, O., Turner, R., 2000. A Method for Removing Imaging Artifact from Continuous EEG Recorded during Functional MRI. NeuroImage 12, 230–239. https://doi.org/10.1006/nimg.2000.0599
- Moosmann, M., Schönfelder, V.H., Specht, K., Scheeringa, R., Nordby, H., Hugdahl, K., 2009. Realignment parameter-informed artefact correction for simultaneous EEG–fMRI recordings. NeuroImage 45, 1144–1150. https://doi.org/10.1016/j.neuroimage.2009.01.024
- Mullinger, K.J., Yan, W.X., Bowtell, R., 2011. Reducing the gradient artefact in simultaneous EEG-fMRI by adjusting the subject’s axial position. NeuroImage 54, 1942–1950.
- Rusiniak, M., Lewandowska, M., Wolak, T., Pluta, A., Milner, R., Ganc, M., Włodarczyk, A., Senderski, A., Śliwa, L., Skarżyński, H., 2013a. A modified oddball paradigm for investigation of neural correlates of attention: a simultaneous ERP–fMRI study. Magn. Reson. Mater. Phys. Biol. Med. 26, 511–526. https://doi.org/10.1007/s10334-013-0374-7
- Rusiniak, M., Wolak, T., Lewandowska, M., Cieśla, K., Skarzynski, H., 2013b. The relation between EPI sequence parameters and electroencephalographic data during simultaneus EEG-fMRI registration: an initial report., in: ESMRMB 2013 Congress, Book of Abstracts, Saturday. Presented at the ESMRMB, Springer, Toulouse, p. 661. https://doi.org/10.1007/s10334-013-0384-5
Cite error: <ref> tags exist, but no <references/> tag was found
