Difference between revisions of "Integration with MRI and fMRI"
| Line 58: | Line 58: | ||
* After aligning the EEG / MEG and the MRI data it is possible to co-locate dipoles and MRI locations. This means, it is possible to visualize the dipoles and to specify the dipole parameters in the MRI coordinate system. | * After aligning the EEG / MEG and the MRI data it is possible to co-locate dipoles and MRI locations. This means, it is possible to visualize the dipoles and to specify the dipole parameters in the MRI coordinate system. | ||
* [[Integration_with_MRI_and_fMRI#Co-locating_Sources_and_MRI_in_the_BESA_Research_Source_Module|How to Co-locate sources and MRI in the BESA Research Source Module]] describes how in the BESA Research Source Analysis module dipoles can directly be visualized in the space of the individual MRI. | * [[Integration_with_MRI_and_fMRI#Co-locating_Sources_and_MRI_in_the_BESA_Research_Source_Module|How to Co-locate sources and MRI in the BESA Research Source Module]] describes how in the BESA Research Source Analysis module dipoles can directly be visualized in the space of the individual MRI. | ||
| − | * [[Integration_with_MRI_and_fMRI#Send_a_Dipole_from_BESA_Research_to_BrainVoyager|How to Send a | + | * [[Integration_with_MRI_and_fMRI#Send_a_Dipole_from_BESA_Research_to_BrainVoyager|How to Send a discrete Solution to BESA MRI]] describes how to export the current solution to the co-registered MRI and open it in BESA MRI. |
Revision as of 14:14, 25 November 2021
| Module information | |
| Modules | BESA Research Basic or higher BESA MRI |
| Version | BESA Research 6.1 or higher BESA MRI 2.0 or higher |
Contents
Introduction
Both for developing and evaluating dipole source models of EEG or MEG activity, it is useful to have access to structural MRI or fMRI data.
The BESA MRI software allows to preprocess structural MRI data so that the individual anatomical information contained in the MRI can be utilized in BESA Research.
BESA MRI makes it possible ...
- ... to align the EEG and MEG sensors with the structural MRI data.
- ... to read and display the aligned, individual Talairach structural MRIs directly in the BESA Research Source Analysis module. In this way, source analysis results can be presented on top of the aligned MRIs, which allows us to evaluate the anatomical regions to which the reconstructed sources may correspond.
- ... to use an individual, realistically shaped FEM or BEM head model for source analysis in BESA Research. FEM and BEM head models take into account the individual volume conduction properties of the subject's head derived from the structural MRI data. This allows for more accurate source analysis (Yvert 1997, Lanfer 2012).
- ... overlay source analysis results obtained in BESA Research with fMRI data.
- ... use fMRI BOLD regions or MRI structures to initialize dipole models.
- ... use fMRI image to constrain EEG/MEG source localization
- ... send discrete source analysis results from BESA Research to BESA MRI to visualize them in both Talairach and subject-specific (ACPC) coordinates.
The chapters below describe the steps necessary to integrate the MRI and fMRI data with BESA Research.
It is also possible to use BESA Research with BrainVoyager. Detailed instructions on (f)MRI import and processing in Brain Voyager is provided by the BrainVoyager Getting Started Guide that can be downloaded from the Brain Innovation website: BrainVoyager Downloads.
Aligning Coordinate Systems
- For a given BESA data set, the electrode and other head surface points need to be aligned to the MRI coordinates.
- The basic steps necessary to align the EEG electrode locations, the MEG sensors and the MRI are described in Section How Coregistration is done.
- Detailed instructions on how to align EEG / MEG and MRI data using BESA MRI can be found in the coregistration quick guide which is available on the BESA homepage (Quick Guides).
- Detailed instructions on how to align EEG / MEG and MRI data using BrainVoyager are described in Section How To set up Coregistration between BESA and BrainVoyager.
- In BESA Research, all necessary settings with regard to the alignment are made in the Coregistration Dialog.
- Requirements with respect to the MRI data for a good coregistration can be found in Section MRI Requirements for Good Coregistration.
- Requirements with respect to EEG and MEG data for a good coregistration can be found in Section EEG/MEG Data Requirements for Good Coregistration.
Generating an individual, realistically shaped FEM head model
- The generation of a FEM head model that can be used in BESA Research is done in BESA MRI as an additional step following the EEG / MEG to MRI coregistration.
- Detailed instructions on how to generate the FEM head model can be found in the coregistration quick guide which is available on the BESA homepage (Quick Guides).
Co-locating dipoles and MRI locations
- After aligning the EEG / MEG and the MRI data it is possible to co-locate dipoles and MRI locations. This means, it is possible to visualize the dipoles and to specify the dipole parameters in the MRI coordinate system.
- How to Co-locate sources and MRI in the BESA Research Source Module describes how in the BESA Research Source Analysis module dipoles can directly be visualized in the space of the individual MRI.
- How to Send a discrete Solution to BESA MRI describes how to export the current solution to the co-registered MRI and open it in BESA MRI.
References
Lanfer, B., I. Paul-Jordanov, M. Scherg, and C. H. Wolters. “Influence of Interior Cerebrospinal Fluid Compartments on EEG Source Analysis.” In Proceedings BMT 2012, Vol. 57. Jena: De Gruyter, 2012. doi:10.1515/bmt-2012-4020.
Yvert, B., O. Bertrand, M. Thévenet, J. F. Echallier, and J. Pernier. “A Systematic Evaluation of the Spherical Model Accuracy in EEG Dipole Localization.” Electroencephalography and Clinical Neurophysiology 102, no. 5 (May 1997): 452–59. doi:16/S0921-884X(97)96611-X.
How Coregistration is done
This section outlines the basic steps to coregister the EEG / MEG data to an individual MRI. These steps are necessary to load an individual MRI into BESA Research.
What happens:
- EEG / MEG sensor locations and the MRI data are defined in different coordinate systems. Setting up coregistration is the process of aligning the two coordinate systems.
- BESA Research uses the Coregistration Dialog to coordinate the alignment procedure.
- Alignment is done with the AC-PC-transformed MRI.
- BESA Research displays the Talairach-transformed MRI in the source analysis module.
- A coregistration file (with the extension ".sfh") is used to mediate between BESA Research and BESA MRI (or BrainVoyagerQX):
- BESA Research writes the coregistration file which contains the coordinates of head surface points (fiducials, electrodes, other digitized surface points).
- The coordinates are read into BESA MRI (or BrainVoyager), and aligned with the AC-PC-transformed MRI. The alignment information is then appended to the coregistration file. The names of the AC-PC MRI (*.vmr) and the surface mesh (*.srf), and, if available, the Talairach transformation, are also appended.
- BESA Research reads the coregistration file and appends the name of the Talairach-transformed MRI and head surface. If a brain surface has been created, this is also appended.
- Subsequently, BESA Research reads the coregistration file automatically when loading the data file.
- In the BESA Research source module, the individual MRI is displayed instead of the standard MRI. Talairach coordinates of dipoles are the "real" Talairach coordinates as defined, e.g., in BrainVoyager.
The steps you have to take (once for each data set):
- From the BESA Research Coregistration Dialog, write a coregistration file. Switch to BESA MRI (or BrainVoyagerQX).
- If BESA MRI is used follow the steps in the coregistration quickguide which is available on the BESA homepage (Quick Guides).
- If BrainVoyager is used follow the steps in Section “How to set up coregistration between BESA and BrainVoyager”.
- Back in BESA Research, reload the altered coregistration file. When using BESA MRI the file names of the generated surface and volume data files will be automatically filled in. When using BrainVoyager file names are only filled in automatically when the files are named according to the file naming conventions. Otherwise, file names have to be set manually.
- The coregistration file is now associated with the data file in the BESA Research database and will be used automatically the next time the file is opened in BESA Research. If the database entry is cleared, and the data are reloaded, you must make sure the coregistration file is also loaded (either using the Coregistration Dialog or the Channel and digitized head surface point information Dialog).
Alignment of BESA and MRICoordinate Systems
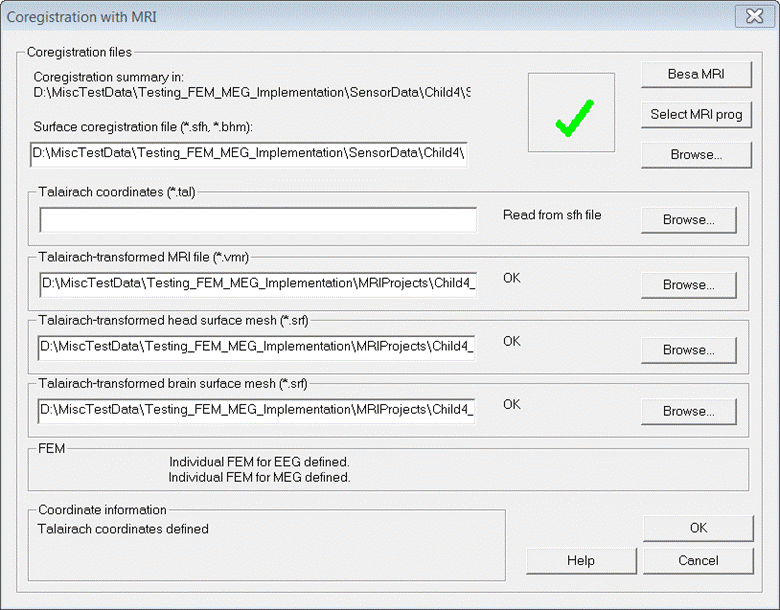
The Coregistration Dialog
The dialog is opened either from the Channel and digitized head surface point information (Ctrl-L) dialog by pressing the Edit/Coreg button, or from the main menu ("File/MRI Coregistration...").
Note: If the coregistration dialog is invoked from an EEG data set in which no digitized electrode coordinates are available (i.e. standard electrode positions located on a sphere are assumed), BESA Research presents a warning message, saying that for MRI coregistration realistic electrode coordinates produce better results. BESA Research has a list of such realistic standard coordinates (i.e. located on a pre-defined standard head surface) for various electrodes available in file Default.sfp, which is located in the Standard Electrode folder. If all electrodes in the dataset are listed in this file, a dialog window suggests to apply this file to the current data set, i.e. to switch from standard sphere coordinates to the standard realistic electrode coordinates in file Default.sfp. If the suggestion is accepted, default.sfp is assigned to the dataset (see Channel and digitized head surface point information (Ctrl-L) dialog).
The Dialog:
- Press the Select MRI prog button to select your preferred MRI program. The current choice is between BESA MRI.exe and BrainVoyagerQX.exe. The path to the MRI program is saved (in System\BESA.set) and will be remembered by BESA Research. The top right hand button (now showing BESA MRI) shows the current selection.
- Press the BESA MRI button to start the process of aligning the BESA Research and MRI coordinate systems. If no coregistration (*.sfh) file is defined in the dialog (empty Surface coregistration file edit box), BESA Research will first prompt for a file name. We recommend saving this file to the folder where the MRIs are kept. The MRI program will then be started. When you return to the Coregistration Dialog, BESA Research checks if the Coregistration File has changed. If so, the dialog is updated with the new information.
- Press the top Browse... button to select a preexisting Coregistration File.
- The entries in the edit boxes below show the files that will be used in the BESA Research Source Analysis module when the individual MRI is loaded. When using BESA MRI the file names will be automatically filled in. If you are using BrainVoagerQX and you are following our (and the BrainVoyagerQX) recommended naming conventions for files, and the files exist, then the names will be filled in automatically after you have completed the alignment procedure in BrainVoyagerQX. Otherwise you may have to browse for the files.
- Below the edit boxes the FEM field states whether all necessary information for the individual FEM head model were found in the coregistration file. If the field says Individual FEM for EEG defined! then all necessary data was found and the individual FEM EEG head model can be used in the BESA Research Source Analysis module. A similar message indicates whether the FEM MEG head model is available.
- Note that the MRI and the surfaces are Talairach-transformed! Alignment between BESA Research and the individual MRI is done with the MRI transformed to the AC-PC coordinate system, but the BESA Research Source Analysis module uses the Talairach-transformed image data and surfaces.
Setting Up Coregistration Using BrainVoyager
It is assumed that you know how to load an MRI as a 3D data set into BrainVoyagerQX, and how to clean the image so that regions outside the head are black. We also assume knowledge of how to create AC-PC-aligned and Talairach-transformed MRIs.
Perform the following steps:
- BESA Research. Start the Coregistration Dialog. Export the Coregistration File (head surface points) from your data by pressing the BrainVoyagerQX button in the dialog. Save the file to the directory where your MRI is located. BrainVoyagerQX is started.
- BrainVoyagerQX. Load the MRI corresponding to the EEG/MEG data. For optimal performance, the MRI should be cleaned so that regions outside the head are black. Prepare an AC-PC-transformed MRI and a Talairach MRI. For each, generate a surface mesh. Save these files following our recommended naming conventions (see chapter MRI File Name Conventions). Save the Talairach coordinate file (*.tal). If these steps have already been performed, load the ACPC MRI and load the ACPC mesh. If you want to generate a brain surface mesh, see chapter How to Generate a Brain Surface Mesh.
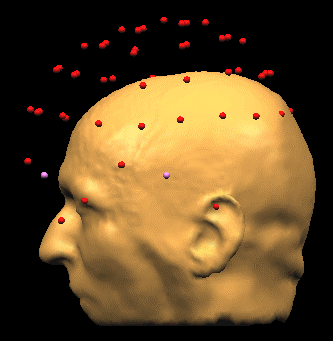
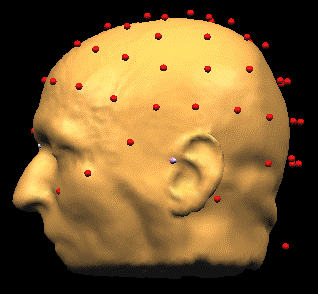
- BrainVoyagerQX. Load the Coregistration File (EEG-MEG BESA/Load Surface Points). The points will be displayed, but they are not aligned to the head:
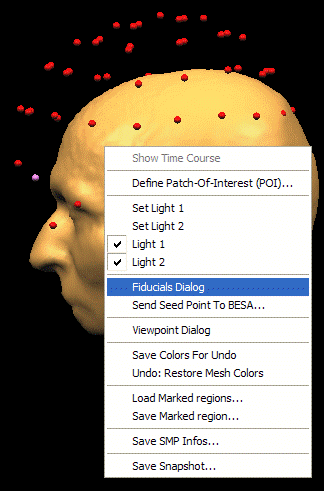
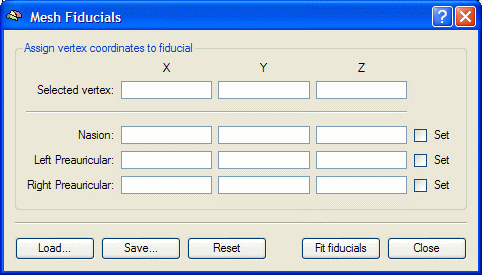
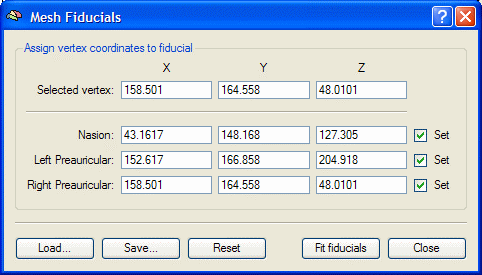
- BrainVoyagerQX. Define fiducial points on the head surface. Right click on the 3D head display and select the Fiducials Dialog in the drop-down menu:
- BrainVoyagerQX. Rotate the head (by holding the Shift button down and clicking and dragging with the mouse) so that the Nasion is clearly visible. Move the mouse to the Nasion, and press Ctrl+Left Click. The coordinates of the Nasion are inserted into the dialog. Repeat for the left preauricular point, and then for the right preauricular point.
Note: if you have defined your fiducials differently in your BESA Research data (e.g. ear holes), click on the corresponding points in the MRI. If you have additional head surface points (step 8), accuracy in pinpointing the fiducials is not critical.
- BrainVoyagerQX. In the Fiducials Dialog, press the Fit fiducials button. The head surface points are now more or less aligned to the head.
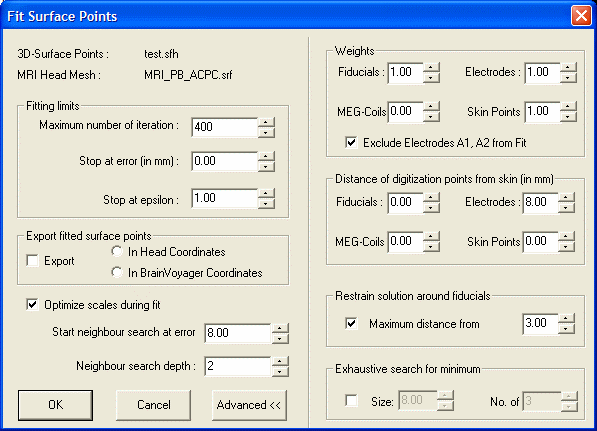
- BrainVoyagerQX. Now select EEG-MEG BESA/Fit Surface Points...
If you do not see the right half of the dialog, press the Advanced >> button.
- Specify the distances of the digitization points from the skin. In the illustration above, the digitization points for electrodes are estimated to be 8 mm from the surface of the head. For the purpose of accurate alignment, the distance of digitization points from skin section of the dialog needs to be filled in correctly. We recommend that "Restrain solution around fiducials" is checked, and a reasonable limit (here 3 mm) of the restraint is defined. Then press OK.
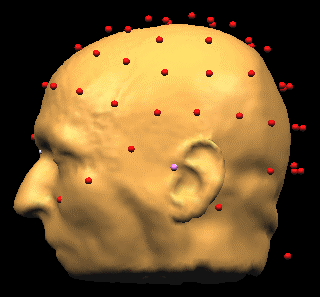
BrainVoyager fits the points to the head, stretching x, y, and z coordinates to obtain a better fit than before.
Note: The fit performed during this step accounts for scaling inequalities between the x, y, and z axes in the MRI. Coregistration gains in accuracy over the use of fiducials alone a) because more head surface points are used, and b) because the scaling inequalities are accounted for.
- Alignment is now completed. If you only want to display the structural MRI in the BESA Source Module, you can return to the BESA Coregistration Dialog.
- BESA Research. When you switch back to the Coregistration Dialog, BESA Research will try to fill in the names of the Talairach MRI and surface meshes. If the names are not filled in, use the Browse... buttons to select the MRI and surface meshes. Press OK to save the Coregistration File. Alignment is completed!
The alignment steps need only be performed once for a given MRI and EEG/MEG data set. Otherwise, after starting BrainVoyager, just load the MRI, the surface mesh, and the surface points (see How to Set Up Coregistration with BrainVoyager after Alignment has been Done). Now the following actions are possible: see chapters
- How to Co-Locate Sources and MRI in the BESA Research Source Module
- How to Send a Dipole from BESA Research to BrainVoyager
- How to Define a Dipole in BESA Research at a Location Defined in the MRI
MRI file Name Conventions
If you follow the naming conventions for file names as described here, BESA Research detects the file names it requires, and the Coregistration Dialog is filled in automatically.
Please note that BESA MRI automatically uses these naming conventions for the generated files.
- The AC-PC MRI file name should end with "_ACPC.vmr", and the corresponding surface mesh name should end with "_ACPC.srf". After alignment, BrainVoyagerQX writes these names to the Coregistration File.
- The Talairach MRI file name should end with "_TAL.vmr", and the corresponding surface mesh name should end with "_TAL.srf". If defined, the brain surface mesh should end with "_TAL_WM.srf" (WM = white matter).
- How BESA Research finds the Talairach files. When BESA Research rereads the Coregistration File after alignment of the coordinate systems, it finds the ACPC file names and defines the corresponding TAL file names. If these files exist, the names are entered into the Coregistration Dialog. For instance, if the Coregistration File contains the name "MRI PB_ACPC.vmr", BESA Research will look for the files "MRI_PB_TAL.vmr", "MRI_PB_TAL.srf", and "MRI_PB_TAL_WM.srf". If these files exist, they are entered into the dialog.
- Older BrainVoyager version. If you use BrainVoyager.exe to align coordinate systems, the file names are not saved with the Coregistration File. In this case, browse for the Talairach or the ACPC MRI from the Coregistration Dialog. BESA Research will use the rules as described above to insert the correct file names into the dialog.
- Missing Talairach coordinates. If, after aligning coordinate systems, the Talairach coordinates are missing from the Coregistration File (you forgot to load the Talairach coordinates in BrainVoyagerQX, or you used BrainVoyager.exe), BESA Research will look for a file ending with "_ACPC.tal", and read the coordinates from this file. You can also browse for a *.tal file in the Coregistration Dialog. For instance, if the MRI file is named "MRI_PB_ACPC.vmr" or "MR_ PB_TAL.vmr", BESA Research will look for "MRI_PB_ACPC.tal" to find the Talairach coordinates.
- File names in the Coregistration File are saved relative to the Coregistration File location, if they are in the same folder. If the MRIs are in the same folder as the Coregistration File they will be recorded as ".\filename" (e.g. ".\MRI PB_tal.vmr"). This means that you can copy the Coregistration File together with the MRIs and meshes to a different folder, and BESA Research will be able to locate the files when the Coregistration File is opened. If the MRIs are saved in a different folder from the Coregistration File, the absolute paths are saved in the file. If the files are moved to new locations, you will have to restart the Coregistration Dialog and redefine the file locations.
How to Generate a Brain Surface Mesh
BESA Research is able to compute surface images, such as (Cortical LORETA, Cortical CLARA, Minimum Norm) using an individual cortex surface as the source space. A suitable cortex surface for this purpose can be effortlessly created using BESA MRI. Alternatively, BrainVoyager can be used for the creation of the brain surface mesh.
BESA MRI
- The brain surface generation is performed as one work step of the BESA MRI segmentation workflow.
- The cortex surface reconstruction is done using a robust and accurate automatic segmentation procedure.
- Details on how to generate the brain surface mesh in BESA MRI can be found in the coregistration quickguide which is available on the BESA homepage: Quick Guides.
BrainVoyager
- BrainVoyagerQX provides a semiautomatic procedure to generate meshes for the brain surface of the Talairach MRI. Please refer to the BrainVoyager Help to find out how to do this.
- The result of the BrainVoyager procedure is two meshes, one for the left and one for the right hemisphere.
- BESA Research requires a single mesh. Therefore, load first one mesh (Meshes/Load Mesh...), and append the other mesh (Meshes/Add Mesh...). Merge these two meshes (Meshes/Merge meshes in surface window) and then save the result (Meshes/Save Mesh...). If possible, use the recommended name conventions for the resulting file (file name ends in "_TAL_WM.srf"). For instance, if the Talairach MRI is named "MRI PB_TAL.vmr", name the brain surface mesh "MRI PB_TAL_WM.srf".
- See also the BrainVoyager Getting Started Guide that can be downloaded from the Brain Innovation website: BrainVoyager Downloads.
Co-locating Dipoles and MRI Locations
Co-locating Sources and MRI in the BESA Research Source Module
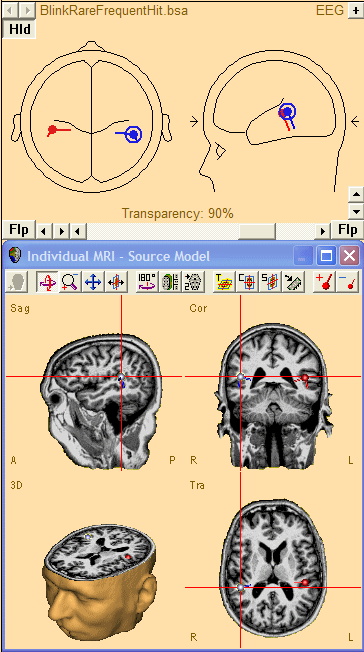
If the alignment procedure using BESA MRI (or BrainVoyager) has been completed then you can load the individual structural MRI in the Source Module by pressing 'A' or using a mouse right click and selecting Display MRI.
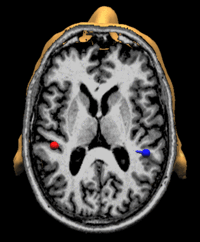
Sources in the current model are then overlayed onto the individual MRI.
A double-click at any location in the MRI will define a new source at the corresponding location in the BESA Research head model.
Coregistration with BrainVoyager after Alignment has been Done
Alignment between BESA Research and BrainVoyager is only required once for a given BESA Research data set and the corresponding MRI. At a later time, if you want to Co-locate sources between BESA Research and BrainVoyager, perform the following steps in BrainVoyager:
- Load the MRI.
- Load the head surface mesh (Meshes/Load Mesh...).
- Load the Coregistration File (EEG-MEG BESA/Load Surface Points...).
BrainVoyager is now ready for Co-location.
Send a Dipole from BESA Research to BrainVoyager
First, start BrainVoyager(QX). This can be done from the BESA Research Source Module by pressing the BrainVoyager button. Note that in the Source Module, the Options / Preferences / BrainVoyager tab allows to define the path to BrainVoyager.
In BrainVoyager, set up coregistration.
In the BESA Research Source Module, highlight the dipole of interest.
In the BESA Research Source Module, click on the BrainVoyager button.
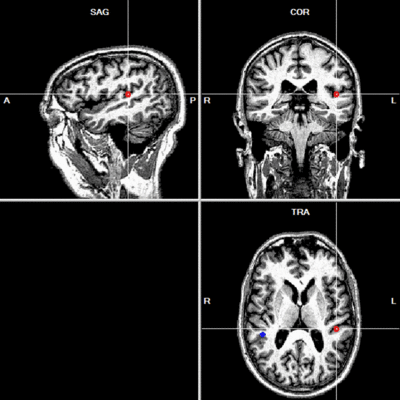
Program control will automatically switch to BrainVoyager. The head will be cut at the section corresponding to the dipole of interest.
Note that all dipoles in the current model are sent to BrainVoyager. The highlighted dipole (here, the red dipole) determines the plane at which the head will be cut.
Note that the dipoles are visible in both the surface module and in the 2D view:
Define a Dipole in BESA Research at a Location Defined in the MRI
First set up coregistration (see chapter Coregistration with BrainVoyager after Alignment has been Done).
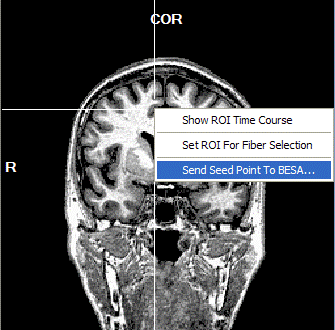
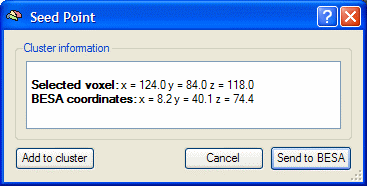
In the BrainVoyager 2D MRI view, place the mouse over the point at which you would like to define a dipole. Right click at this point. If this point lies within an fRMI cluster, BrainVoyager will automatically determine its center and use it as a seeding point instead. Press Send Seed Point To BESA....
The following Dialog is opened:
Press Send to BESA.
The BESA Source Analysis window appears. The new dipole or regional source (depending on the setting in the ‘Options’ dialog in the Source Analysis window is now displayed at the corresponding location. If a dipole is seeded, BESA automatically fits its orientation. For further adjustment of the model, you may need to refit the orientation, e.g. at a certain time range, or in the presence of other sources.
Detailed instructions on (f)MRI import and processing in Brain Voyager is provided by the BrainVoyager Getting Started Guide that can be downloaded from the Brain Innovation website: BrainVoyager Downloads.
Reference
The Coregistration File (*.sfh)
This file is used to mediate between BESA Research and BESA MRI (or BrainVoyager(QX)). When it is first written by BESA Research, it contains a list of the digitized head surface points (fiducials, electrodes, other digitized points), e.g.
NrOfPoints: 68
 Fid_Nz                    0.00000     103.10000       0.00000   3 255  128  255
 Fid_T9                  -78.40000       0.00000       0.00000   3 255  128  255
 Fid_T10                  73.00000       0.00000       0.00000   3 255  128  255
 Ele_E1                  -28.70000      23.90000     122.30000   3 255    0    0
 Ele_E2                  -80.40000      19.80000      75.90000   3 255    0    0
 Ele_E3                  -84.00000      37.90000       9.00000   3 255    0    0
 Ele_E4                  -17.60000      92.90000      89.10000   3 255    0    0

...

 Ele_E63                  -6.80000    -104.00000      54.40000   3 255    0    0
 Ele_E64                 -42.80000     -46.90000     115.60000   3 255    0    0
 Ele_Cz'                  -2.10000       2.20000     131.10000   3 255    0    0
Each line contains a label, the coordinates in the Head Coordinate system, and parameters specifying the size and color of the sensor or head surface point as displayed in BESA MRI (or BrainVoyager).
After aligning the coordinate systems, BESA MRI (or BrainVoyagerQX) appends lines defining the transformation between the BESA Research and the MRI coordinate systems:
# Trans-data(in BV-coords): 3 translation, 3 rotation (in grad), 3 scale
37.435 15.811 2.820 0.025 1.938 8.779  1.009 0.973 0.977
Fiducials:
41.7873  148.0180  128.0844
154.7772  169.4783  204.1080
147.0154  168.9746  54.1266
Midpoint (in BV-coords):
128.0000  128.0000  128.0000
Volume:  C:\BESA\Examples\ERP P300-Auditory\MRI_PB_acpc.vmr
Surface: C:\BESA\Examples\ERP P300-Auditory\MRI_PB_acpc.srf
AC: 128 128 128
PC: 154 128 128
AP: 58 128 128
PP: 241 129 130
SP: 154 50 128
IP: 128 172 128
RP: 128 128 60
LP: 165 128 198
Note: Older versions of BrainVoyager.exe do not append the lines starting with "Volume". In addition, the Talairach coordinates (starting at "AC: ...") are not appended if they were not loaded in BrainVoyagerQX.
Finally, when the Coregistration Dialog in BESA Research has found the Talairach MRI and surface meshes, and you press the OK button, BESA Research appends the additional file names:
TalVolume: C:\BESA\Examples\ERP P300-Auditory\MRI_PB_tal.vmr
TalSurface: C:\BESA\Examples\ERP P300-Auditory\MRI_PB_tal.srf
TalBrainSurface: C:\BESA\Examples\ERP P300-Auditory\MRI_PB_tal_wm.srf
BESA MRI already inserts the correct file names into the coregistration file when doing the coregistration. When also an EEG or MEG FEM head model is generated then additional lines are appended to the coregistration file containing the file names of the generated FEM data files.
MRI Requirements for Good Coregistration
We recommend a high quality T1-weighted anatomical image with 1 mm³ voxels (e.g. 256 x 256 saggital scan with 1 mm spacing).
In order to define the surface mesh, a clear contrast between the head surface and the outside of the head (T1-weighting) is required. Noise and measurement artifacts can influence the representation of the scalp surface. When doing the coregistration in BrainVoyager improvements in noisy images often can be achieved by cleaning up the image after first reading it using the tools provided by BrainVoyager.
For coregistration with head surface points, it is useful to include the whole head in the image, including nose and ears. If surface points on the nose are included with the EEG/MEG data set, these points help to stabilize the fit of head surface points to the surface mesh.
EEG/MEG Data Requirements for Good Coregistration
We recommend several (30 or more) digitized head surface points in addition to the fiducials, including points on the nose (nose tip and sides). These points may include electrodes. In the case of electrodes, it is important to measure the distance from the scalp to the digitization point, i.e. the electrode thickness.
| Review | |
|---|---|
| Source Analysis | |
| Integration with MRI and fMRI |
|
| Source Coherence | |
| Export | |
| MATLAB Interface | |
| Special Topics | |
